Storing BitLocker Recovery Keys in Active Directory and Microsoft Entra ID –
Where a device’s BitLocker recovery key is stored depends on how the device is joined: domain-joined devices back up to Active Directory Domain Services (AD DS) through Group Policy, and Entra-joined devices escrow to Microsoft Entra ID through Intune. Hybrid-joined devices can do either or both.
Audience: Windows endpoint, Active Directory and Intune administrators, plus service desk staff who retrieve keys.
Scope: Windows 10/11 and Windows Server OS and fixed data drives. Removable drives (BitLocker To Go) follow the same pattern with their own policy settings.
| Device join type | Where the key goes | Configured with |
| On-premises domain-joined | AD DS computer object | Group Policy (GPO) |
| Microsoft Entra joined | Entra ID device object | Intune endpoint security policy |
| Microsoft Entra hybrid joined | AD DS, Entra ID, or both | GPO and/or Intune (pick one policy owner) |
| Workgroup / personal | Microsoft account or file (out of scope) | User |
BitLocker key escrow paths · AD DS and Entra ID
The highlighted boxes are where keys live; hybrid devices can follow either path or both.
Prerequisites
Backup never happens on its own: Microsoft warns that escrow to Entra ID or AD DS may not be automatic and must be enabled by policy (Microsoft Learn). Confirm the items below before rollout.
| Item | Active Directory (Part A) | Microsoft Entra ID (Part B) |
| Device state | Domain-joined, line of sight to a DC when BitLocker turns on | Entra joined or Entra hybrid joined (Entra registered devices do not escrow) |
| Management tool | Group Policy Management Console | Microsoft Intune admin center |
| Admin rights to configure | Edit rights on the target GPO | Intune Administrator or Policy and Profile Manager (Intune RBAC) |
| Rights to read keys | Domain Admins by default; delegate to helpdesk | Cloud Device Administrator, Helpdesk Administrator, or a custom role with microsoft.directory/bitlockerKeys/key/read |
| Viewing tool | RSAT: BitLocker Recovery Password Viewer (ADUC extension) | Entra admin center, Intune admin center, Microsoft Graph |
| Client OS | Windows 10/11, Windows Server 2016+ | Windows 10/11 Pro, Enterprise or Education |
- ☐ Decide which system owns BitLocker policy for hybrid devices (GPO or Intune), so the two never conflict
- ☐ Install the BitLocker Recovery Password Viewer on helpdesk admin workstations
- ☐ Agree on who may read keys and put those roles under just-in-time activation (PIM) where available
Part A: Back up keys to Active Directory with Group Policy
A GPO tells each domain-joined device to write its recovery password to a child msFVE-RecoveryInformation object under its own computer account, and to refuse to encrypt until that write succeeds.
AD DS backup flow · 1 decision, 1 retry loop
If the domain controller is unreachable, encryption waits rather than running without a backed-up key.
Step 1: Create and link the GPO
- Open Group Policy Management (gpmc.msc).
- Right-click the OU that holds the target computers and select Create a GPO in this domain, and Link it here. Name it, for example, SEC – BitLocker – AD Key Backup.
- Right-click the new GPO and select Edit.
- Go to Computer Configuration > Policies > Administrative Templates > Windows Components > BitLocker Drive Encryption.
Step 2: Configure the recovery settings
| Folder | Setting | Value |
| Operating System Drives | Choose how BitLocker-protected operating system drives can be recovered | Enabled |
| Allow 48-digit recovery password | Require (or Allow) | |
| Save BitLocker recovery information to AD DS for operating system drives | Checked | |
| Configure storage of BitLocker recovery information to AD DS | Store recovery passwords and key packages | |
| Do not enable BitLocker until recovery information is stored to AD DS for operating system drives | Checked | |
| Fixed Data Drives | Choose how BitLocker-protected fixed drives can be recovered | Enabled, same four options as above |
| Removable Data Drives (optional) | Choose how BitLocker-protected removable drives can be recovered | Enabled, same options if BitLocker To Go is in use |
The “Do not enable BitLocker until…” box is what guarantees every encrypted disk has a key in AD: encryption simply will not start if the DC write fails.
Step 3: Apply and enable
- On a test client, run gpupdate /force and confirm the GPO with gpresult /r /scope computer.
- Turn on BitLocker (Control Panel, manage-bde -on C: -RecoveryPassword, or your deployment tool). The key is written to AD at that moment.
Step 4: Back up devices that were encrypted before the GPO
Devices already encrypted do not back up retroactively. Run this elevated on each one (or push it as a startup script):
$vol = Get-BitLockerVolume -MountPoint $env:SystemDrive
$kp = $vol.KeyProtector | Where-Object KeyProtectorType -eq ‘RecoveryPassword’
foreach ($p in $kp) {
Backup-BitLockerKeyProtector -MountPoint $env:SystemDrive -KeyProtectorId $p.KeyProtectorId
}
The command-line equivalent is manage-bde -protectors -adbackup C: -id {KeyProtectorID}. If a volume has no recovery password protector, add one first with manage-bde -protectors -add C: -RecoveryPassword.
Part A: View and retrieve keys in Active Directory
Helpdesk staff find a key by computer name or by the 8-character Recovery Key ID shown on the user’s blue recovery screen. By default only Domain Admins can read BitLocker recovery information (Microsoft Learn).
Install the viewer (once per admin workstation)
- Windows 11/10: Settings > System > Optional features > Add a feature > RSAT: BitLocker Drive Encryption Administration Utilities
- Windows Server: Install-WindowsFeature RSAT-Feature-Tools-BitLocker-BdeAducExt
By computer name
- Open Active Directory Users and Computers and browse to the computer’s OU.
- Right-click the computer, select Properties, then the BitLocker Recovery tab.
- Match the Password ID to the Recovery Key ID on the user’s screen and read out the 48-digit password.
A
aThe newest entry is usually the current key; always confirm by Password ID, since old entries remain after re-encryption.
By Recovery Key ID
- In ADUC, right-click the domain and select Find BitLocker Recovery Password.
- Enter the first 8 characters of the Password ID and select Search.
With PowerShell
$pc = Get-ADComputer -Identity ‘PC-0142’
Get-ADObject -SearchBase $pc.DistinguishedName `
-Filter ‘objectClass -eq “msFVE-RecoveryInformation”‘ `
-Properties whenCreated, msFVE-RecoveryPassword |
Sort-Object whenCreated -Descending |
Select-Object whenCreated, Name, msFVE-RecoveryPassword
The object Name starts with the creation timestamp followed by the Password ID in braces.
Delegate read access to the helpdesk
msFVE-RecoveryPassword is a confidential attribute, so ordinary Read is not enough. In ADUC, on the computers OU, use Delegate Control with a custom task: object type msFVE-RecoveryInformation, permissions Full Control (or Read plus the Control Access right on that attribute). Scope the group to the OUs it supports.
Part B: Escrow keys to Microsoft Entra ID with Intune
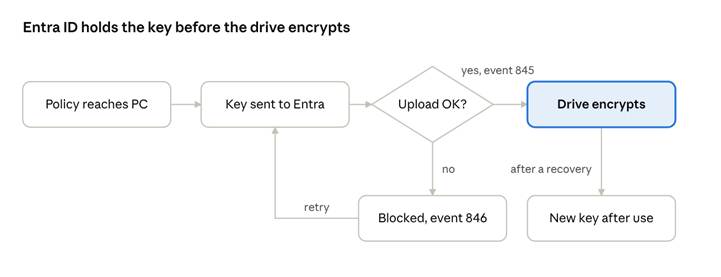
An Intune disk encryption policy enables BitLocker and makes the device upload its recovery password to its own Entra ID device object before encryption starts. The key then shows in both the Entra and Intune admin centers.
Entra ID escrow flow · upload check and rotation
With rotation enabled, a used recovery password is replaced and the new one is escrowed automatically.
Step 1: Create the policy
- Sign in to the Microsoft Intune admin center (intune.microsoft.com).
- Go to Endpoint security > Disk encryption > Create Policy.
- Platform Windows, profile BitLocker, then Create. Name it, for example, SEC – BitLocker – Entra Escrow.
Step 2: Configure the settings
The settings come from the same BitLocker policy CSP as Group Policy, so several labels still say “AD DS”. On an Entra joined device those options write to Entra ID; on a hybrid joined device they write to both.
| Category | Setting | Value |
| BitLocker | Require Device Encryption | Enabled |
| BitLocker | Allow Warning For Other Disk Encryption | Disabled (silent enable) |
| BitLocker | Allow Standard User Encryption | Enabled (silent enable for non-admins) |
| BitLocker | Configure Recovery Password Rotation | Refresh on for Azure AD-joined devices (or both Azure AD and hybrid-joined) |
| Operating System Drives | Choose how BitLocker-protected operating system drives can be recovered | Enabled |
| Allow 48-digit recovery password | Require | |
| Save BitLocker recovery information to AD DS for operating system drives | True | |
| Configure storage of BitLocker recovery information to AD DS | Backup recovery passwords and key packages | |
| Do not enable BitLocker until recovery information is stored to AD DS for operating system drives | True | |
| Omit recovery options from the BitLocker setup wizard | True (users never see the save-key prompt) | |
| Fixed Data Drives | Choose how BitLocker-protected fixed drives can be recovered | Enabled, same options |
Step 3: Assign and monitor
- Assign the policy to a pilot device group first, then widen it.
- Watch Devices > Monitor > Encryption report for encryption status and errors.
- On the client, the Event Viewer log Applications and Services Logs > Microsoft > Windows > BitLocker-API > Management records event 845 when escrow to Entra succeeds and 846 when it fails.
Step 4: Escrow devices that were encrypted earlier
Devices encrypted before the policy (for example by an old GPO) keep their keys local. Push this as an Intune Remediation or platform script running as SYSTEM:
$vol = Get-BitLockerVolume -MountPoint $env:SystemDrive
$vol.KeyProtector |
Where-Object KeyProtectorType -eq ‘RecoveryPassword’ |
ForEach-Object {
BackupToAAD-BitLockerKeyProtector -MountPoint $env:SystemDrive -KeyProtectorId $_.KeyProtectorId
}
The device must be Entra joined or hybrid joined for this to work; Entra registered (BYOD) devices cannot escrow.
Part B: View and retrieve keys in Entra ID
Keys are readable in three admin places and, by default, by the device’s owner at myaccount.microsoft.com. Every key read through Graph is logged under the KeyManagement category of the Entra audit log (Microsoft Graph).
Microsoft Entra admin center
- Go to entra.microsoft.com and activate your key-reader role if you use PIM.
- By Key ID: Devices > BitLocker keys, search the Recovery Key ID from the user’s screen.
- By device: Devices > All devices, open the device, select BitLocker keys, then Show recovery key.
Entra admin center BitLocker keys page · annotated illustration
Each Show recovery key click is audited, so readers should open only the key they need.
Microsoft Intune admin center
Devices > Windows, open the device, select Recovery keys. Admins can also run BitLocker key rotation from the device’s overflow menu.
Microsoft Graph PowerShell
Connect-MgGraph -Scopes ‘BitlockerKey.Read.All’ -NoWelcome
$dev = Get-MgDevice -Filter “displayName eq ‘PC-0142′”
Get-MgInformationProtectionBitlockerRecoveryKey -Filter “deviceId eq ‘$($dev.DeviceId)’” |
ForEach-Object {
(Get-MgInformationProtectionBitlockerRecoveryKey -BitlockerRecoveryKeyId $_.Id -Property key).Key
}
This pattern comes from Microsoft’s recovery process guide (Microsoft Learn).
Who can read keys
| Role | Notes |
| Cloud Device Administrator | Common choice for device teams |
| Helpdesk Administrator | Common choice for service desk |
| Intune Administrator | Also reads keys via Intune |
| Security Administrator, Security Reader, Global Reader | Read-only roles that include key read |
| Custom role with microsoft.directory/bitlockerKeys/key/read | Least privilege; can be scoped to an Administrative Unit |
| Device owner | Self-service; turn off with Restrict users from recovering the BitLocker key(s) for their owned devices (Entra ID > Devices > Device settings) |
Role list per the Graph permissions note and the Entra helpdesk recovery guidance.
Hybrid devices, verification and troubleshooting
Hybrid joined devices
A hybrid device can hold its key in both directories, which is the safest state during a migration to Intune. Keep one policy owner: if both a GPO and an Intune profile set BitLocker, the GPO generally wins on the overlapping settings and results become hard to predict. A common path is to leave the AD GPO in place, add the Intune policy, run the Part B Step 4 script to escrow existing keys to Entra, then retire the GPO once the Encryption report is clean.
Verification checklist
- ☐ manage-bde -protectors -get C: on the client lists a Numerical Password protector
- ☐ Its ID matches a Password ID on the ADUC BitLocker Recovery tab (Part A)
- ☐ Its ID matches a key under the device in Entra BitLocker keys (Part B)
- ☐ Event 845 (Entra) is present in the BitLocker-API Management log
- ☐ A helpdesk test account can read the key; a standard account cannot
- ☐ A test recovery on a pilot device unlocks, and rotation produces a new key afterwards
Troubleshooting
| Symptom | Likely cause | Fix |
| No key in AD for an encrypted PC | Encrypted before the GPO applied | Run the Part A Step 4 backup |
| BitLocker will not start on a domain PC | “Do not enable until stored in AD DS” is on and no DC was reachable | Connect to the corporate network or VPN, then retry |
| BitLocker Recovery tab missing in ADUC | Viewer not installed | Install the RSAT BitLocker utilities |
| Helpdesk sees the tab but no password | Missing Control Access on the confidential attribute | Re-run delegation with Full Control on msFVE-RecoveryInformation |
| No key in Entra / Intune | Device is Entra registered, or encrypted before policy | Check dsregcmd /status for AzureAdJoined = YES; run Part B Step 4 |
| Event 846 on the client | Escrow to Entra failed | Check the device’s Entra join and network, then rerun the backup |
| User cannot self-serve the key | Restriction setting is on, or user is not the device owner | Expected; route to helpdesk |
Key rotation
With Configure Recovery Password Rotation set, Entra joined and hybrid joined devices create a new recovery password after one is used and store it in Entra ID (Microsoft Learn). AD-only devices do not auto-rotate: after a recovery, remove the old protector, add a new one, and back it up again.