Best Practice to Secure Office 365
Office 365 Security Defaults
Security Defaults in Microsoft Office 365 are preconfigured security settings that help you secure your Office 365 data against common threats. These settings include:
- Enable multi-factor authentication (MFA) for all users and admins
- Blocking legacy authentication protocols
- Require users to use MFA when necessary (risky sign-in events)
- Block user access to Azure Portal
If your tenant was created after October 21, 2019, then it’s possible that the security defaults setting is enabled for your tenant.
Before you enable security defaults in Microsoft 365 you should keep a few things in mind. You can’t make any exceptions to the policies. So you can’t disable MFA for one user or turn on the SMTP Authentication Protocol if you need it for a specific business application.
Also, you can only use the Microsoft Authenticator app using notifications for multi-factor authentication. Text messages or app passwords can’t be used with security defaults enabled.
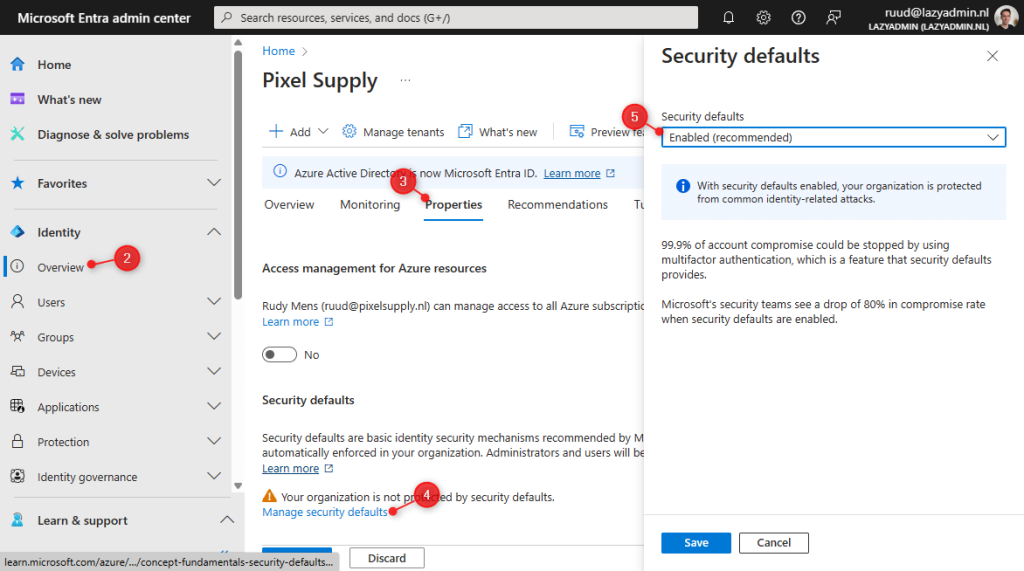
To enable or disable Security Defaults you will have to login into the Azure Active Directory Admin Center:
- Log in at entra.microsoft.com
- Click on Identity and select Overview
- Open the Overview tab
- Click on Manage Security Defaults
- Enable Security Defaults
If you need to disable security defaults, then make sure you at least enabled MFA for all the admins and users where possible and block all legacy protocols (per user).
Configure Multi-factor Authentication
Enabling multi-factor authentication (MFA) is the most recommended security measure to secure Office 365. It protects your accounts against phishing attacks and password sprays. Multi-factor authentication should be enabled for all admin and user accounts.
First, we are going to check the default multi-factor authentication settings.
- Log in at entra.microsoft.com
- Expand Protection and open Authentications Methods
- Check if Microsoft Authenticator is enabled for All Users
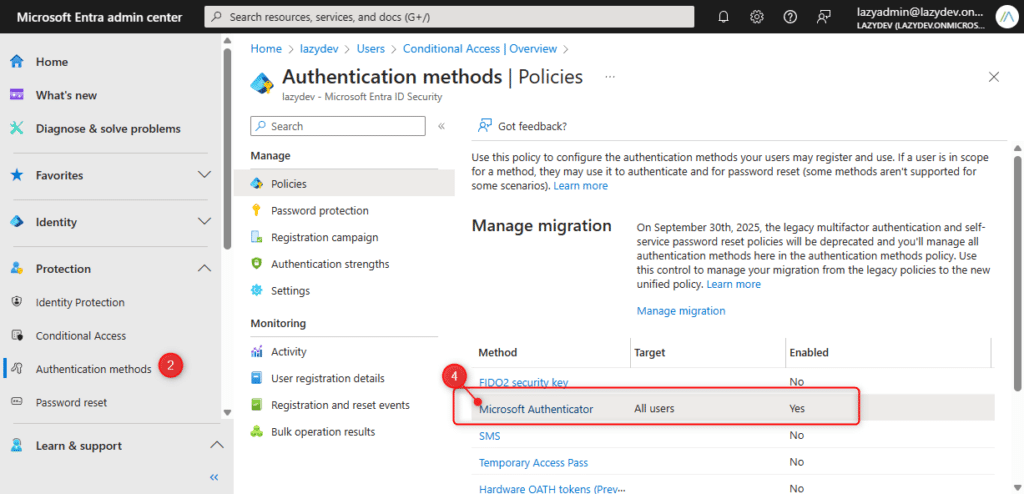
- Click on Microsoft Authenticator to open the settings
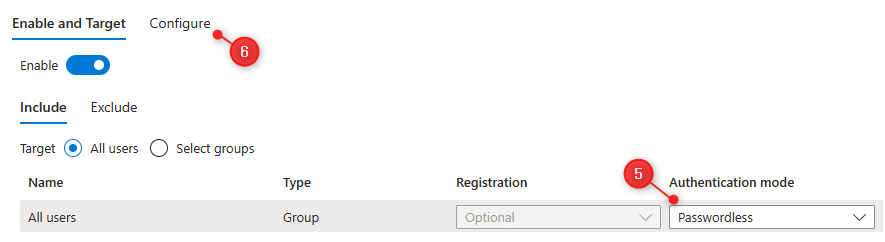
- Make sure that the Authentication Method is set to Password Less
- Click on Configure
- Enable Show Application Name and the option Show Geographic location
Enabling MFA for your users
The best way to implement MFA is based on conditional access. You get this when you use the security defaults, but if you don’t want to or can’t use security defaults, then you will need Entra ID Plan 1 for this.
TipRead more about setting up Conditional Access Policies in this article
If you don’t want to use the security defaults and you don’t have Conditional Access, then your only option is to enable MFA for each user manually.
A good option is to inform your users about MFA and give them a two-week period to enable MFA themself. Users can enable MFA through the following link https://aka.ms/mfasetup.
Next, you can use this PowerShell script to get all the users that don’t have MFA enabled yet, and even enable it per user with the following script.
Create an emergency access Admin Account
Microsoft recommends that you create two emergency admin accounts. The idea behind this is that these accounts are excluded from multi-factor authentication and conditional access policies. If you don’t use conditional access policies, then one emergency account excluded from MFA is enough.
These accounts prevent you from being locked out of your Azure Active Directory in case of an unforeseen circumstance. For example, a mobile phone network outage that prevents you from approving the MFA request or the sudden leave of the only Global Administrator.
Don’t use these accounts on a daily basis, only when you lose access to Entra ID with your normal global admin account.
You can create the admin account in the Microsoft 365 admin center under Users > Active Users > Add a user.
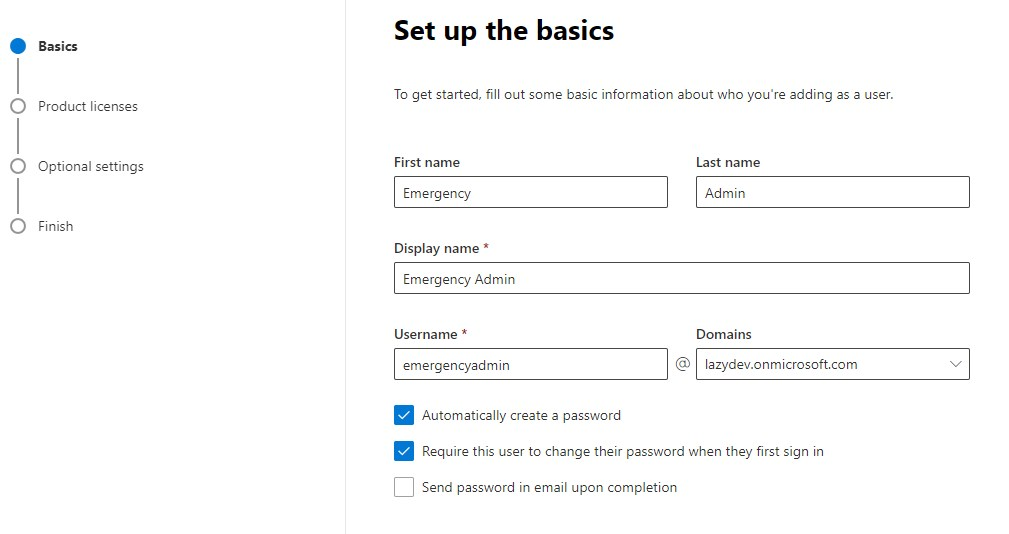
You don’t need to assign a product license to the user, only make sure you give the account Global Administrator access under the optional settings.
Write down the temporary password and change the password to a strong and very long randomly generated password. Store the password in a safe place to which multiple authorized people have access.
Make sure you exclude one account from the Conditional Access policies (if you use them) and exclude the other account from multi-factor authentication.
You can find more information about the emergency admin account here in the Azure AD documentation.
Assign Role-Based Access Control (RBAC) for admins
Role-based access control for admins is based on the principle of least privilege (POLP). User (admin) accounts should always have the minimum privilege level that is needed to do their job.
Helpdesk employees don’t need to have Global Administrator access, for example, they could probably do their job with only the Helpdesk and User administrator role.
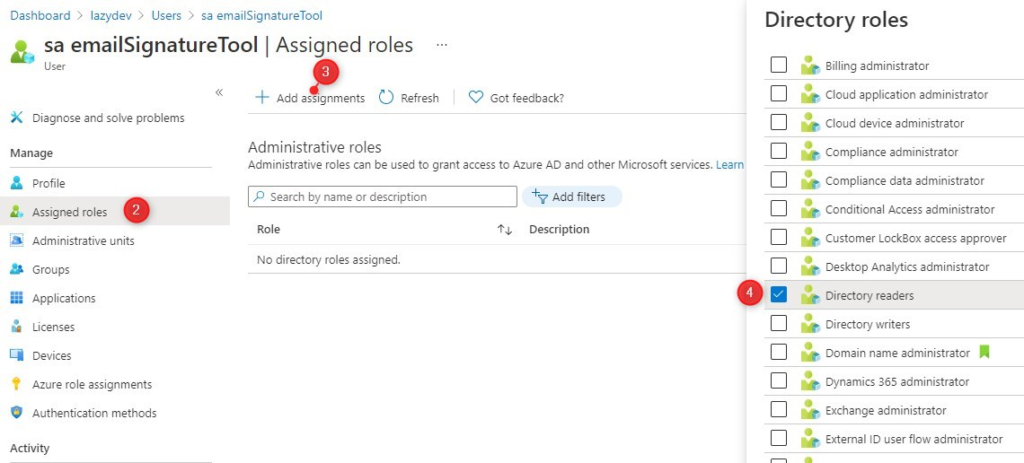
For service accounts that only need to read user accounts from the Azure Active Directory, you could use the Directory Reader role. This allows the application to read all the user accounts.
You can assign the roles in the Microsoft 365 Admin Center. But I find it easier to do this through Microsoft Entra ID:
- Open All Users and select the user you want to change
- Click on Assigned Roles
- Click Add assignments
- Select the appropriate role(s) and click on Add
You can also view all the roles and the assigned users under Roles and administrator in the Azure Active Directory.
Enable Unified Audit Log
While we need to do everything to prevent unauthorized access and to secure our Microsoft 365 tenant, we also need to plan ahead in case someone gained access to our systems. Logging allows you to trace back when, what, and maybe even how a breach happened.
The mailbox audit log is enabled by default, but you also want to enable the Unified Audit Log. This allows you to collect all the logs in the Microsoft 365 Compliance Center, which makes it easier to search through them. It also allows you to create alerts based on events that happen.
Each entry in the Unified Audit Log is kept for 90 days by default. If you need to keep the entries longer then you will need an E5 license for your users.
We can use PowerShell to enable the Unified Audit Log. Make sure you are connected to Exchange Online and run the following cmdlet:
# Get the current Unified Audit Log status
Get-AdminAuditLogConfig | select UnifiedAuditLogIngestionEnabled
# Enable Unified Audit Log
Set-AdminAuditLogConfig -UnifiedAuditLogIngestionEnabled $true
You can also enable it in the Compliance Center.
- Open the Compliance Center (Microsoft Purview)
- Click on Solutions and choose Audit
- Click on Start recording user and admin activity

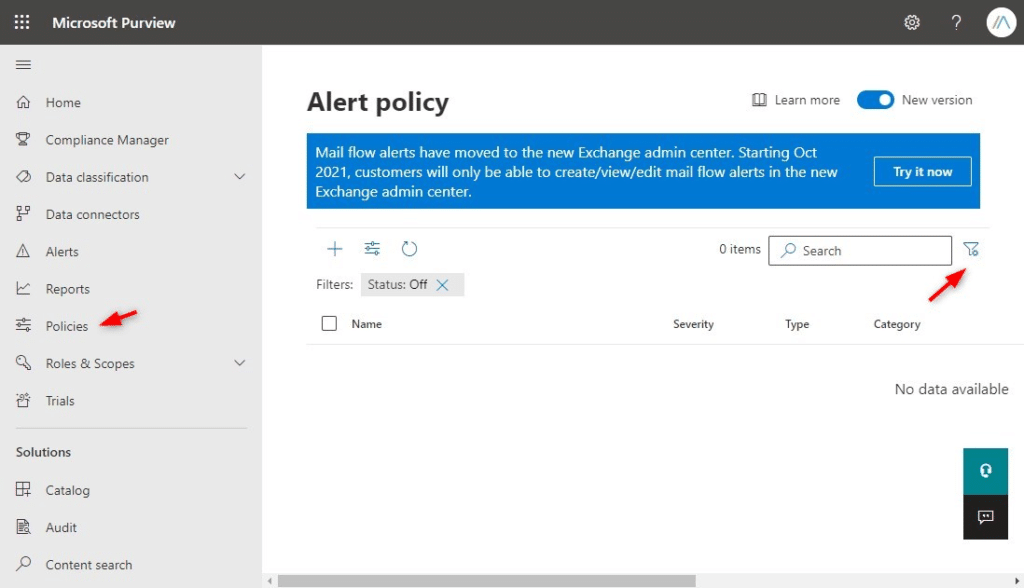
Enable Alert Policies
Alert Policies are enabled by default in your Microsoft Office 365 Tenant. These policies help you to track user and admin activities, and alert you in case of threats or data loss incidents. You will find the policies Microsoft 365 Compliance (Purview) under Policies. They are listed as Alert Polices.
Check if all the system-type policies are enabled by filtering the list on Status – Off.
To prevent data loss I also recommend that you create a new alert that is triggered when a Team is deleted. When a Team owner deletes a Team from the list with Teams then this can also result in the deletion of the SharePoint site and all the data.
Enable Continuous Access Evaluation
Authentication in Microsoft 365 is based on OAuth 2.0 access tokens. These tokens authorize the user to access the services, for example when a user opens Outlook or logs into SharePoint. By default, the token is valid for one hour and refreshes automatically in the background when it’s expired.
The problem with this token lifetime of an hour is that any changes in the user’s authorization are only detected after an hour at most. When the user, for example, changes from one network location to another, then the conditional access policies are only triggered when the token is renewed.
By enabling Continuous Access Evaluation (CAE) we can shorten this period to nearly real-time, with a max of 15 minutes due to event propagation time.
NoteMicrosoft has move CAE to Conditional Access, which requires atleast an Entra ID P1 plan. Continuous Access Evaluation is auto enabled as part of an conditional access policy. You can fine tune CAE under the Session setting of a Conditional Access Policy.
Enable Azure Portal Inactivity Timeout
In the Azure Portal, you can set an inactivity timeout for all the portal users (and admins). You will need to have Global Administrator rights to change the settings.
- Clear on the gear icon
- Open Signing out + notifications
- Enable directory-level idle timeout
- Set it to 30 minutes for example
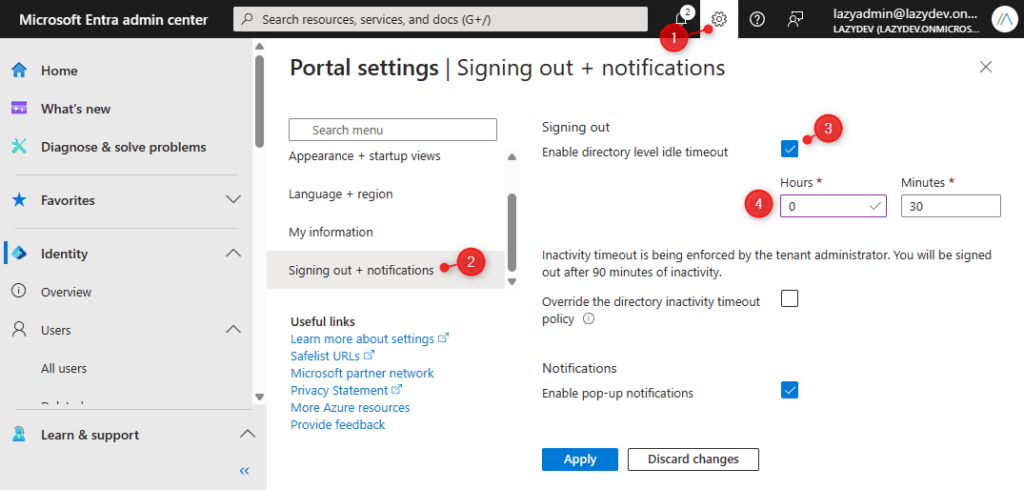
Any portal user that is inactive for more than 30 minutes will get automatically signed out. I assume that your admins already have a proper habit of locking their devices when they leave them unattended, but an extra security measure never hurts.
Enable Preset Security Policies in Exchange Online
Microsoft has created two preset security policies for Exchange Online, a standard, and a strict policy to secure your Office 365 mail. These templates contain policies to protect your Exchange Online environment against the latest attack trends.
The advantage of using one of these templates instead of creating the policies manually is that they will automatically update your settings with Microsoft’s latest recommendations.
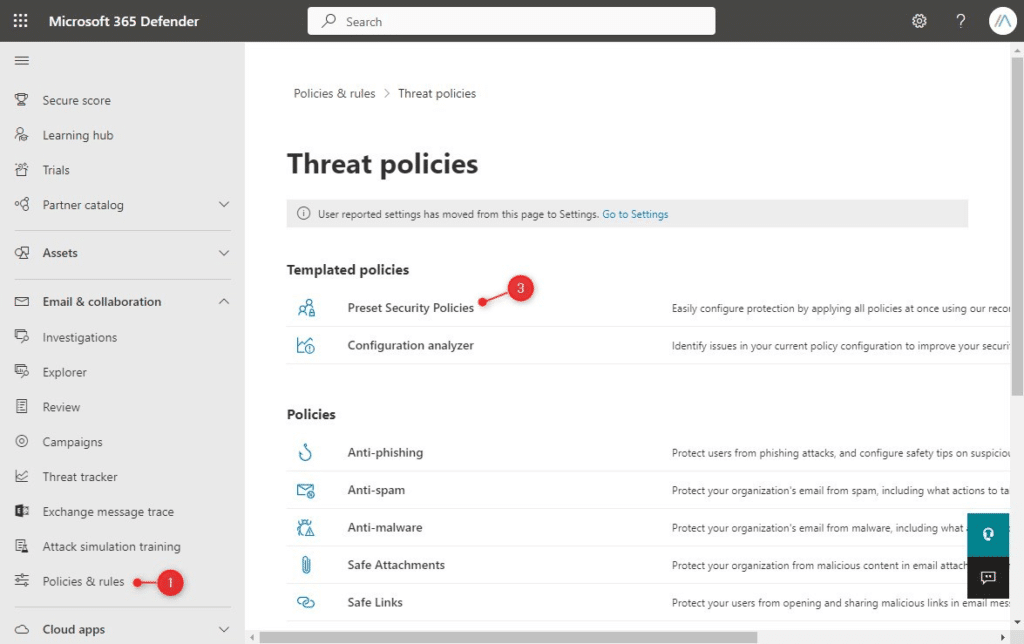
You can find the policies in the Security Admin Center (Microsoft 365 Defender)
- Expand Email & collaboration and select Policy & Rules
- Choose Threat policies
- Click on Preset Security Policies
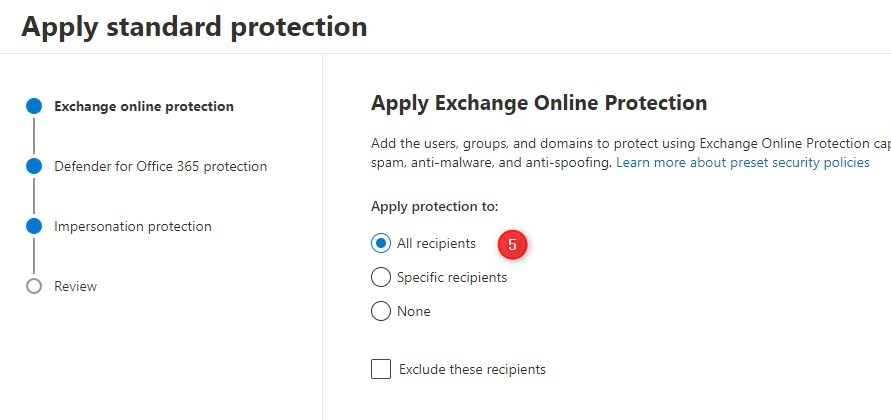
- Enable and Edit the Standard Protection
- Make sure that Apply Exchange Online Protection is set for All recipients
- Click on Next
- If you have Defender for Office 365 protection then set it also to All recipients
Depending on your license, you can also configure the Impersonation protection. Add users to are likely to get impersonated, these are often the management board, directors, and HR.
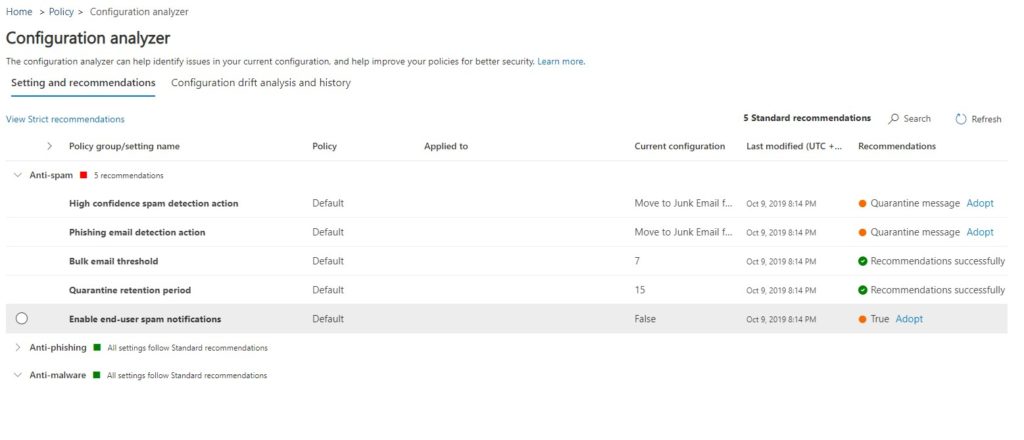
In addition to the security policy template, also check the Configuration Analyzer (which you will find under Policies & Rules > Threat Policies). This will recommend changing some settings that are not covered by the standard template that you should adopt:
- High-confidence spam detection action
- Phishing email detection action
- Bulk email threshold
- Quarantine retention period
- Enable end-user spam notifications
- Common Attachment Types Filter
I also recommend using the free 365 Threat Monitor from Hornetsecurity. This tool monitors your user’s mailboxes and alerts you when phishing mail slips through the Exchange Online security. This is a great way to see how good (or bad) your policies are working.
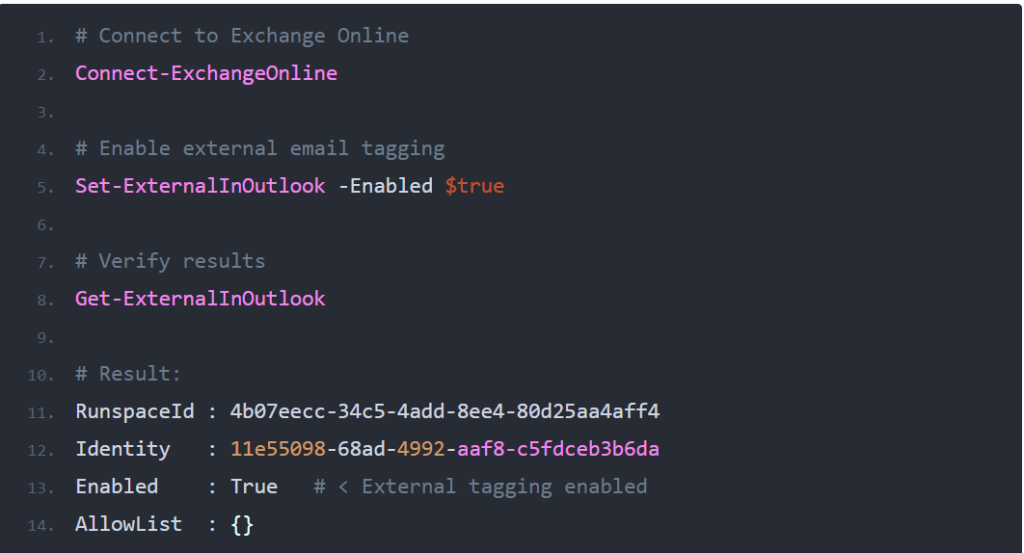
Enable External Email Tagging
A newly released feature in Exchange Online allows you to tag external emails. External email tagging is an extra security measure to make your users more aware of the origin of the email. We often see phishing mail attacks where the attackers spoof an internal email address.
By automatically tagging all external emails, we can make it clearer to the users that the email was sent from outside the organization.
At the moment we need to use PowerShell to enable this new feature, if you want more information about it, then make sure you read this article, where I explain more about email tagging.