Installing and Enabling Hyper-V on Windows –
1. Overview
Hyper-V is Microsoft’s built-in virtualization platform. It lets one physical computer run several virtual machines (VMs), each with its own operating system. It ships with supported Windows editions, so there is nothing to download.
Common uses:
- Running more than one operating system on one computer
- Building isolated test and development environments
- Testing applications and configuration changes without touching the host
- Running Windows and supported Linux VMs
- Building virtual networks for testing and troubleshooting
2. System requirements
The computer must meet every requirement below, per Microsoft’s Hyper-V system requirements.
| Requirement | Minimum |
| Operating system | Windows 10 or 11 Pro or Enterprise (64-bit) |
| Processor | 64-bit with Second Level Address Translation (SLAT) and VM Monitor Mode extensions |
| Memory | 4 GB RAM; plan for enough to run the host and every VM at once |
| Virtualization | Intel VT-x or AMD-V, turned on in BIOS/UEFI |
| Data Execution Prevention | Hardware-enforced DEP turned on (XD bit on Intel, NX bit on AMD) |
Not supported: Windows 10 Home and Windows 11 Home can’t run the Hyper-V role. Windows Server uses a different install process (see section 9).
Education edition: Microsoft’s current list names only Pro and Enterprise. Education is built on Enterprise and normally shows Hyper-V, but confirm on your devices.
Quick check: Run systeminfo in PowerShell or Command Prompt and scroll to Hyper-V Requirements. Every item should read Yes.
Other hypervisors: VMware Workstation and VirtualBox can run unreliably while the Hyper-V hypervisor is on. See Microsoft’s guidance on running them together.
3. Check that hardware virtualization is on
Hyper-V needs hardware virtualization turned on in BIOS/UEFI. Task Manager shows whether it is.
Step 1: Check virtualization status
- Right-click the taskbar and select Task Manager.
- Select the Performance tab, then CPU.
- Find the Virtualization entry below the graph.
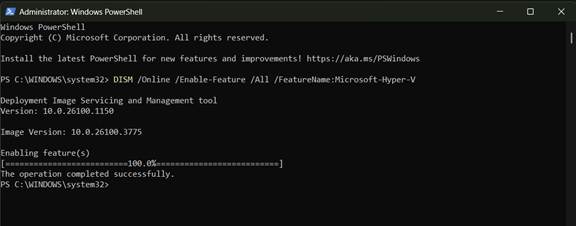
Figure 1: Task Manager’s CPU view, with Virtualization showing Enabled.
- Enabled: go to section 4.
- Disabled: complete Step 2 first.
Step 2: Turn on virtualization in BIOS/UEFI (only if disabled)
- Restart the computer.
- Enter BIOS/UEFI setup. The key varies by manufacturer; F2, F10, F12, Del, and Esc are common.
- Open the processor, CPU, or security configuration settings.
- Turn on the setting for your processor:
- Intel: Intel Virtualization Technology (VT-x)
- AMD: SVM Mode or AMD-V
- Save changes and exit.
- Let Windows start, then repeat Step 1 to confirm.
Menu names and layout vary by manufacturer and model. Check the manufacturer’s support site if the setting is hard to find.
4. Install Hyper-V with Windows Features
This is the recommended method for most users. It takes about 5 minutes plus a restart.
Step 1: Open Windows Features
- Select Start, type Control Panel, and open it.
- Select Programs and Features. In Category view, select Programs first.
- In the left pane, select Turn Windows features on or off.
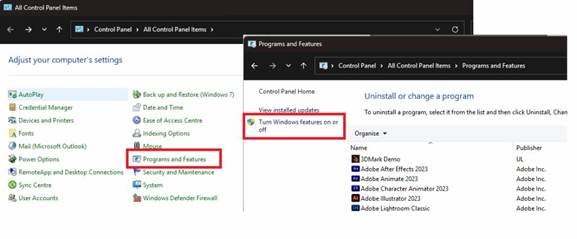
Figure 2: Control Panel, Programs and Features, and the Turn Windows features on or off link.
Shortcut: Press Win + R, type optionalfeatures, and press Enter.
Step 2: Turn on Hyper-V
- Find Hyper-V in the list and select its checkbox.
- Expand Hyper-V and confirm both items are selected:
- Hyper-V Management Tools
- Hyper-V Platform
- Select OK. Windows installs the components.
Figure 3: Windows Features with Hyper-V, Management Tools, and Platform selected.
If Hyper-V Platform is greyed out, the hardware doesn’t meet the requirements. Recheck section 2 and section 3.
Step 3: Restart
- When prompted, select Restart now.
- Wait for Windows to restart fully. It may restart twice.
Hyper-V is now installed. Go to section 6 to verify it.
5. Install Hyper-V with PowerShell or DISM
Administrators can enable Hyper-V from an elevated PowerShell window with either command below. Both do the same thing. Running without admin rights makes the command fail.
Step 1: Open PowerShell as administrator
- Select Start and type PowerShell.
- Right-click Windows PowerShell and select Run as administrator.
Step 2: Run one of these commands
Option A: PowerShell cmdlet
Enable-WindowsOptionalFeature -Online -FeatureName Microsoft-Hyper-V -All
When prompted, enter Y to restart.
Option B: DISM
DISM /Online /Enable-Feature /All /FeatureName:Microsoft-Hyper-V
Wait for The operation completed successfully, then restart the computer.
Figure 4: The DISM command (Option B) completing successfully.
Step 3: Restart and confirm
After the restart, go to section 6 to verify the installation.
6. Verify the installation
Hyper-V is working if Hyper-V Manager opens and lists the local computer.
Step 1: Open Hyper-V Manager
- Select Start and type Hyper-V Manager.
- Select Hyper-V Manager in the results.
- Confirm the local computer name appears in the left pane under Hyper-V Manager.
- Select the computer name and confirm the console loads its Virtual Machines and Actions panes.
Figure 5: Hyper-V Manager with the local host selected.
Step 2: Verify with PowerShell (optional)
In an elevated PowerShell window, run:
Get-WindowsOptionalFeature -Online -FeatureName Microsoft-Hyper-V
The output should include State : Enabled.
You can also run systeminfo. Once Hyper-V is running, its Hyper-V Requirements line reads A hypervisor has been detected. Features required for Hyper-V will not be displayed. That message confirms the hypervisor is active.
7. Create a virtual switch
A virtual switch connects VMs to each other, to the host, or to the physical network. Windows 10 and 11 also create a Default Switch that gives VMs internet access through NAT, so this step is optional for basic use.
| Switch type | VMs can reach | Use it for |
| External | Physical network, host, other VMs | VMs that need to act like real devices on the LAN |
| Internal | Host and other VMs | Host-to-VM testing without network access |
| Private | Other VMs only | Fully isolated lab networks |
- Open Hyper-V Manager and select the computer name.
- Under Actions, select Virtual Switch Manager.
- Select New virtual network switch, choose a type, and select Create Virtual Switch.
- Enter a descriptive name, such as External-LAN.
- For an External switch, choose the physical network adapter.
- Select Apply, then OK.
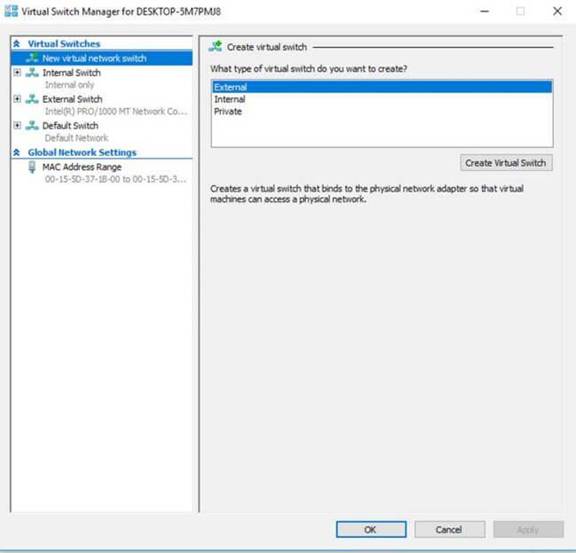
Figure 6: Virtual Switch Manager, creating a new switch.
Important: Creating an External switch briefly drops the host’s network connection. Schedule it if the computer is in use for business work.
8. Troubleshooting
| Problem | Resolution |
| Hyper-V isn’t in Windows Features | Confirm the edition is Pro or Enterprise (Settings > System > About). Home doesn’t support Hyper-V. |
| Only Windows Hypervisor Platform appears, not Hyper-V | The hardware may not meet requirements. Run systeminfo and check section 2. |
| Hyper-V Platform is greyed out | Turn on virtualization in BIOS/UEFI (section 3) and confirm the CPU supports SLAT. |
| Task Manager shows Virtualization: Disabled | Turn on Intel VT-x or AMD-V in BIOS/UEFI. |
| Installation fails | Install pending Windows updates, restart, and retry as an administrator. |
| Hyper-V Manager can’t connect to the local computer | Confirm Hyper-V Platform is on, then restart. Check that the Hyper-V Virtual Machine Management service is running. |
| VMs won’t start | Check free memory and disk space, and that virtualization is still on in BIOS/UEFI. |
| VMware or VirtualBox VMs fail after install | These apps conflict with the running Hyper-V hypervisor. See Microsoft’s compatibility article. |
| VMs have no network | Review the virtual switch type and the physical adapter it uses (section 7). |
9. Important considerations
- Hyper-V is built into supported Windows editions. There is no separate download.
- VMs use the host’s real memory, CPU, and disk. Don’t assign more than the host can spare.
- Store VM files and virtual hard disks on a drive with plenty of free space.
- Hyper-V Management Tools can be installed without SLAT, for managing other Hyper-V hosts remotely.
Windows Server
On Windows Server, Hyper-V is a server role. Install it through Server Manager, or in elevated PowerShell:
Install-WindowsFeature -Name Hyper-V -IncludeManagementTools -Restart